Replacing or installing a heating unit is one of those home projects that runs better with a little planning and a lot of caution. There is heavy equipment moving through your house, live electrical circuits to manage, refrigerant lines if you have a heat pump, gas piping on furnaces, sharp sheet metal, and dust that seems to find every surface. A safe installation day protects your home, your family, and the crew, and it also protects the investment you just made. Over the years, I’ve seen a smooth heating system installation turn tense over small oversights: a blocked path, a tripped breaker at the wrong moment, or a curious pet underfoot. The good news is that most risks are predictable and preventable.
Why safety planning begins before the truck arrives
The installation window is tight. Crews like to roll in, assess the access points, stage materials, shut down utilities, and start removal right away. The first hour sets the tone for the entire job. If the work area is clear, electrical and gas shutoffs are accessible, and everyone knows where not to step, you avoid the two biggest risks on heating replacement day: rushed decisions and rework. Rushed decisions lead to the wrong fittings, an improvised vent transition, or a sloppy drain line route. Rework leads to extra time with panels open and utilities off, which means longer exposure to hazards.
When you think of safety, picture layers. There are safety layers for people in the home, for the crew, for the house itself, and for the equipment. Each layer matters, and they interact. A well-prepared path protects the crew from injuries and the flooring from gouges. A firm, level pad for the air handler keeps vibrations down and prevents future service risks. Good communication avoids surprises with thermostats and Wi‑Fi devices. These details aren’t glamorous, but they are the difference between a four-hour swap and a long day.
Make the house ready, not just tidy
I tell homeowners to walk the path the crew will use as if pushing a dolly loaded with 200 pounds. Go from the driveway to the mechanical closet or basement, then to the outdoor unit if you are installing a heat pump or packaged system. Imagine turning radius, low overheads, and tight corners. If you can preempt obstacles, you remove the single most common cause of minor injuries and damage on heating unit installation days.
Clear a five to six foot radius around the indoor unit. For basements, that often means moving stored boxes, dehumidifiers, and power tools. For a closet unit, it may mean temporarily removing a door to get enough swing room for the evaporator coil or furnace. If the system sits in an attic, consider laying down a temporary runner or plywood sheets to distribute weight and prevent a foot through the ceiling. Ask the installer what they plan to bring for protection, and be ready to supplement. Painters’ plastic and a few drop cloths cost little and save hours of cleanup.
Doors and thresholds create pinch points. If you can pop off a door from its hinges to create two extra inches, do it before the crew lifts the old unit. Moving the old furnace or air handler is the moment when most wall dings happen. On stairs, brace handrails and verify the steps are dry. Shoes pick up condensation from the old evaporator pan and make wood treads slick. Little measures like a towel at the base of stairs and rubber-backed runners matter more than you’d expect.
Utilities: how to shut off safely and why sequence matters
Utility shutoffs are simple in theory, but execution matters. Most installers prefer to control shutoffs themselves. Still, they will ask about panel location, main gas valve, and water supply for condensing furnaces. Know where these are and make sure paths to them are clear.
There is a sequence. Power first, with a lockout at the breaker if possible. Then gas, then water to any condensate pumps or neutralizers that tie in, then refrigerant handling for heat pumps. The order reduces the chance of anyone working live, and it keeps ignition sources https://www.google.com/maps/place/Mastertech+Heating+%26+Cooling+Corp/@40.7058547,-73.8160023,17z/data=!3m1!4b1!4m6!3m5!1s0x89c261a7f9c7496b:0x31931316377876f3!8m2!3d40.7058547!4d-73.8160023!16s%2Fg%2F11xf112d1h?entry=ttu&g_ep=EgoyMDI1MDkxNS4wIKXMDSoASAFQAw%3D%3D off while the gas line is open. If your home has a whole-house generator or battery backup, tell the crew before they pull any disconnects. A surprised auto-transfer can energize a circuit someone assumed was dead.
For older homes, labels on the electrical panel can be unreliable. If the installer has to trial breakers to find the right one, let them work undisturbed and confirm with a non-contact tester. Good crews will use a lockout device and tag. If someone suggests skipping lockout, ask them to do it anyway. It is a small step with outsized value.
When gas is involved, smell and meter both matter. Crews will often soap-test joints after reconnecting and may also use a combustible gas detector. Don’t spray cleaners or paints in the area during that time. Aerosols can confuse sensors, and you do not want volatiles near open piping, even if the valve is closed. If your furnace is in a laundry room, pause dryer use during the gas reconnection phase.
Air quality during demolition and installation
Removing an old furnace or air handler stirs up dust: fiberglass, accumulated household dust, and sometimes drywall debris if modifications are needed. If you or someone in the home has asthma or respiratory sensitivities, plan ahead. Close doors to bedrooms and use a box fan to vent air out of a nearby window if possible. Ask the crew to use HEPA vacuums on duct openings and to bag old filters before moving them.
If your heating replacement includes duct modifications, expect sheet metal snips and a brake, which create shards and slivers. These are unpleasant to step on. Keep the work zone truly restricted. I recommend a simple rule: no one who is not working on the job crosses the drop cloth line. Pets, kids, curious adults, everyone stays out. Installers focus better when they are not glancing over their shoulder every minute.
For gas appliances, there is a second air quality topic: combustion byproducts. A proper combustion analysis and venting check is not optional. A reputable crew will check draft, adjust gas pressure, and verify carbon monoxide levels in the flue with an analyzer. Ask them to show you the readings. Not every install requires fine-tuning, but it takes five minutes and provides confidence that the unit is burning cleanly. If you have a carbon monoxide detector, test it the night before and again after the job. If you do not have one, plan to install at least one near sleeping areas and one near the furnace room.
Refrigerant safety if a heat pump is involved
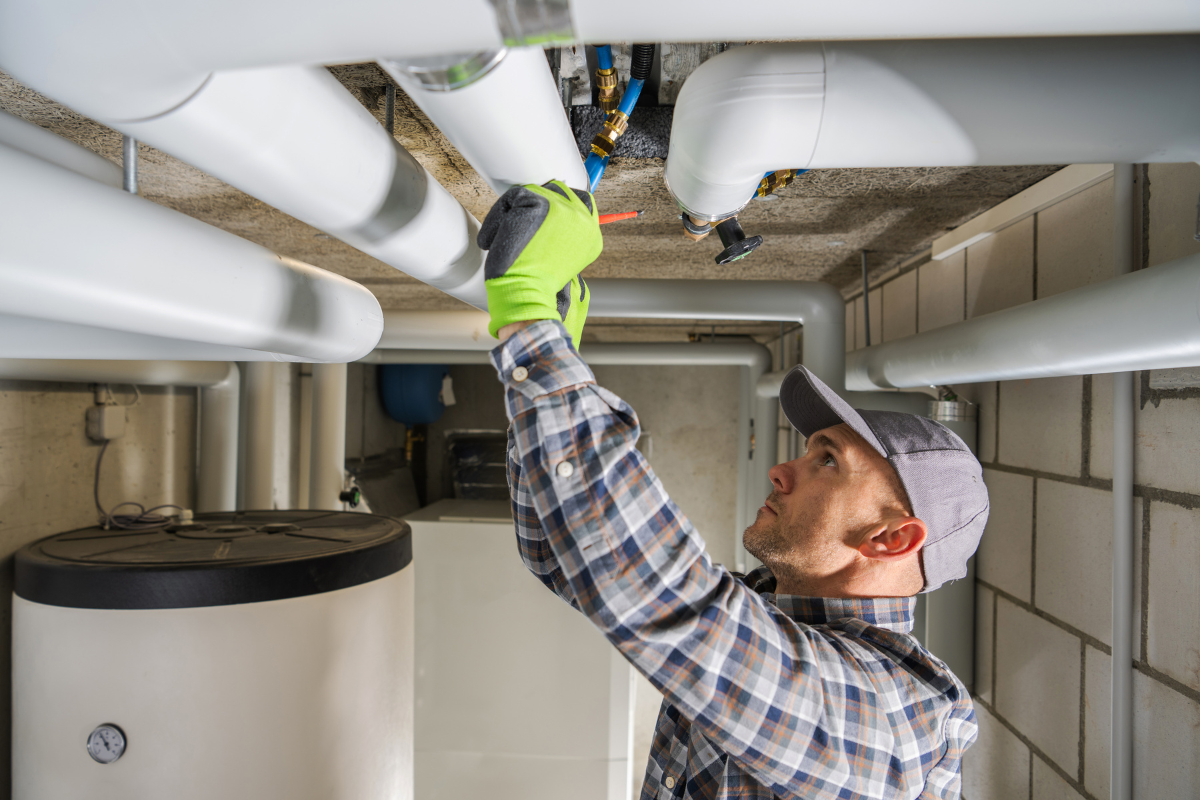
Heat pump installations add refrigerant handling to the day. While technicians are trained and certified to manage refrigerants, you can help by keeping doors closed and the space comfortable. Extreme heat or cold can make brazing and vacuum work more difficult and increases the temptation to rush. When lines are brazed, there will be a torch in use. Combustible materials should be moved away, and fire-resistant blankets used where the line passes near framing or insulation. A good crew purges with nitrogen during brazing to prevent scale inside the lines, then pulls a deep vacuum. That vacuum step should run until the micron gauge reads a stable low value, often under 500 microns, and holds without rapid rise. If they skip the micron gauge and rely only on time, you can politely ask them to verify with a gauge. Moisture in the system shortens compressor life and can lead to acid formation. It’s a durability and safety concern, not a preference.
Expect a mild odor and a small amount of smoke when flux burns during brazing. This is normal, but it is another reason to keep people and pets out of the immediate area. After charging, there should be no oily residue on fittings. Oil often indicates a leak. If you see it, ask for a leak check before panels go back on.
Structural and placement considerations that prevent future hazards
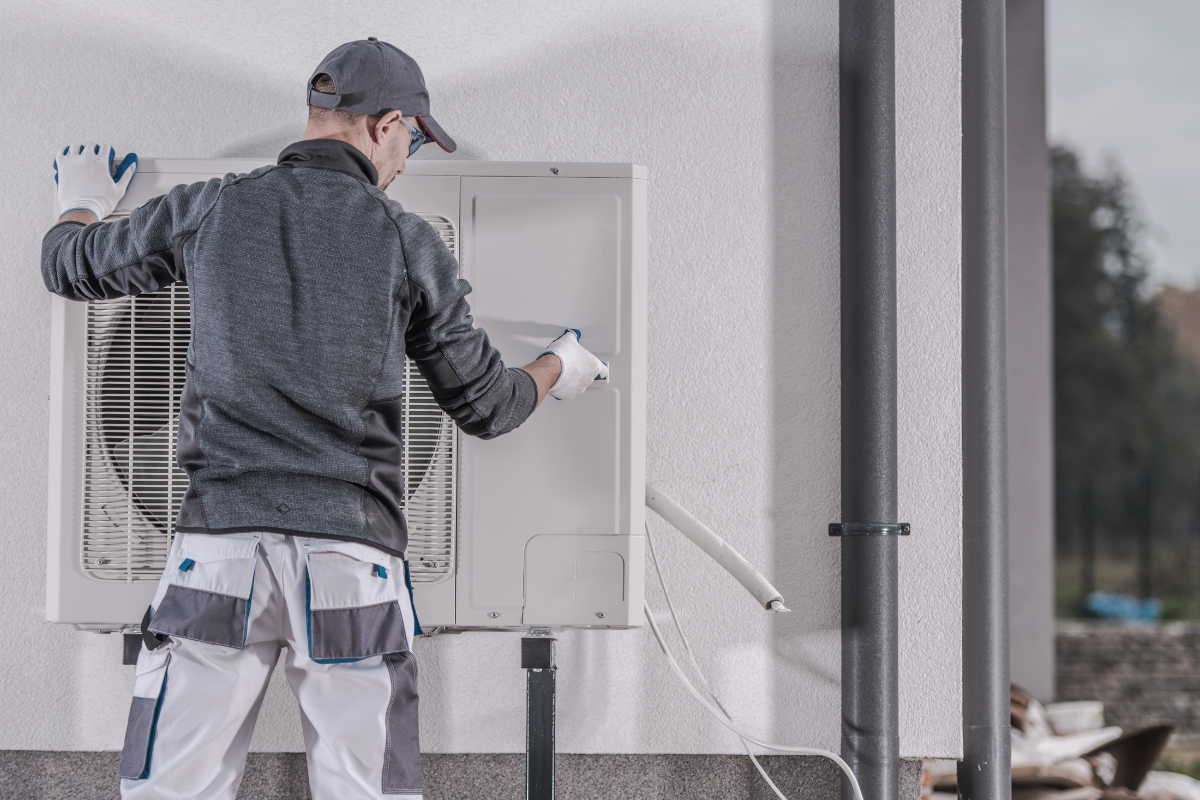
The best heating unit installation avoids today’s hazards and tomorrow’s headaches. Placement and support are part of safety. Indoors, the platform for the furnace or air handler must be level and sturdy. Vibrations travel through framing and can turn fasteners into slow-moving drills, leading to loose panels and rattles that summon service calls. Outdoor units should sit on a level pad, ideally elevated a few inches above grade to avoid standing water or snow. A poorly supported pad shifts, which stresses copper lines and electrical connections.
Clearances matter for both code and practicality. Most manufacturers specify service clearances around the unit, often 24 to 30 inches on the front and sides. Cramped installs lead to acrobatics during maintenance, and acrobatics lead to cuts and strains. Think beyond the day one fit. Replaceable components like filters, humidifier pads, UV bulbs, and drain traps need space to be accessed without dismantling half the system.
Condensate management is frequently overlooked. A high-efficiency furnace or air handler can produce gallons of water on a cold day. The drain must slope properly and be protected against freezing in unconditioned spaces. A blocked drain can overflow into the heat exchanger compartment, corroding burners and electronics. If the unit is above finished space, ask for a secondary drain pan with a float switch. This small device can shut the system off before water damages ceilings. It is a safety device in the quietest sense, preventing water where it does not belong.
Communication: the underrated safety tool
On installation day, decide where decisions will be made and who can authorize changes. Simple questions arise that have consequences: which side should the condensate exit, do you want the filter rack on the return drop or at the grille, should we reuse the old thermostat or install the new one now. The wrong answer can create awkward reaches or trip hazards in the future, like a filter slot facing a cluttered corner. The right answer comes from five minutes of conversation before the saws come out.
Share any known quirks of your home. Maybe the breaker labeled furnace also controls an outlet in the office where a server lives, or the crawlspace access is tight after a recent storage addition. Surprises slow the job and nudge people into shortcuts. The more transparent you are, the smoother and safer the day goes.
Children and pets: logistics that reduce stress
Any installation crew will tell you their hardest moments are when a pet darts into the work zone or a child wanders near a running saw. Arrange care if you can. If not, set up a closed room with food, water, and comfort for pets, clearly marked so the crew doesn’t open it while carrying equipment. For kids, schedule activities away from the main work areas and explain the boundary. The sounds of a heating system installation can be loud and sudden. Hearing protection for kids is a good idea if they will be nearby at any point.
Weather and timing: how the season changes the plan
Heating replacement in winter requires a heat bridge plan. If the old system is dead, you may be without heat for a few hours or longer. Space heaters can help, but they are involved in many winter house fires. Use only modern units with tip-over protection, keep them on hard floors, and never plug them into power strips. If you have a gas stove, do not use it for space heating. Carbon monoxide risk is real, and stoves are not designed for that duty. For longer outages, agree on a start time that gives the crew the maximum daylight window. Crews often work faster and safer when they are not racing sunset.
In hot climates, attic installations in summer can be dangerous for installers. Heat stroke is not theoretical in a 120-degree attic. Be patient with pacing, and offer water if the crew looks depleted. A brief cool-down break can prevent mistakes with torches and saws. If your attic has a powered fan, ensure it is working. Simple things like a ladder secured at the base and a clear landing zone at the attic hatch make a guardrail of sorts for safety.
Permits, codes, and inspections: safety baked into the process
Building codes exist because of earlier failures. A good heating system installation follows manufacturer instructions first, then local code, then common sense, in that order. Ask if a permit is required in your jurisdiction. Many places require one for any gas appliance, for new circuits, and for venting changes. The inspector’s visit is not a nuisance; it is another set of eyes that often catch small misses like missing sediment traps on gas lines, incorrect vent pitch, or unsupported condensate runs.
Keep manuals and documentation. After the crew leaves, you should have the installation manual, wiring diagram, thermostat instructions, warranty registration info, and a model and serial number record. Store this packet with your home documents. If a future service tech needs to confirm vent size or dip switch settings, those pages can prevent a misstep. Some manufacturers require proof of proper commissioning to honor parts or labor coverage. Safety and warranty frequently walk together.
Electrical details worth verifying even if you are not an electrician
A heating unit is part of an electrical system. Wire gauge, breaker size, and disconnects are straightforward but easy to get wrong when swapping brands or models. If your old furnace ran on a 15-amp circuit and the new one calls for 20 amps, the installer should pull the correct wire gauge, not simply swap the breaker. An oversized breaker with undersized wire is a recipe for overheated conductors. At the outdoor unit, ensure a proper rainproof disconnect is present and easy to reach. Conduit should be intact, and the whip should not be strained or rubbing sharp edges.
Grounding and bonding matter for safety and for the electronics in modern furnaces and heat pumps. A missing bond can create nuisance lockouts, erratic sensor readings, or worse, a shock hazard. Ask the crew whether they verified ground continuity and polarity at the receptacles and the equipment lugs. It is a 60-second test with a meter and saves hours later.
Thermostat circuits deserve a quick conversation too. Many smart thermostats require a common wire. If your existing bundle has an extra conductor, great. If not, the installer may add a common wire or a power extender. Running a new cable cleanly, with staples and strain relief, is safer than snaking a loose wire through drywall where it can chafe. If the crew proposes a workaround, consider the long-term reliability. A properly run wire will not come loose. A makeshift spade connector behind a plate can.
Combustion air and ventilation, especially in tight homes
Modern homes are tighter than the ones many of us grew up in. That is good for energy bills and comfort, but it raises the stakes for combustion appliances. A furnace that draws air from the room can starve if the mechanical room is essentially sealed. If your appliance is non-direct vent, make sure combustion air provisions match code, which might mean louvered doors or ducted air from outside. Better yet, many new furnaces are sealed combustion, pulling air from outdoors through a dedicated pipe. That design removes the risk of backdrafting from exhaust fans or range hoods. If your heating replacement involves venting changes, confirm that terminations outdoors meet clearance requirements from windows, doors, and grade. Ice buildup at terminations can cause blockages in winter, so terminations should be placed thoughtfully.
The moment of startup: what safe commissioning looks like
Commissioning is a fancy way of saying the installer verifies the new unit runs as designed. It is also the highest-risk window for a mishap if someone is impatient. Panels should be secured before power comes back on, wire nuts tucked into junction boxes, and tools cleared from the blower compartment. For gas furnaces, the installer will likely clock the gas meter or check manifold pressure to match the input rating. For condensing units and heat pumps, they will check superheat and subcooling or follow the manufacturer’s charge chart in heating mode if applicable.
You can listen for a few telltale signs of trouble: clattering that suggests a loose blower wheel, a sharp hiss at fittings that could indicate a refrigerant leak, or any whistle that sounds like an air leak at a panel seam. A brief smell of new paint or oily film burning off the heat exchanger is normal on first heat. That should fade in minutes. If there is visible smoke, shut it down and investigate. A protective film left on a component can smoke more than expected, but treat smoke as a warning, not a curiosity.
Post-install safety checks you can do the same day
After the crew has cleaned up and you have heat again, there are a few checks you can perform. Verify the thermostat modes work and that the fan runs when commanded. If you have zoning, test each zone. Place a paper towel under the primary condensate drain for a day or two and check for moisture patterns that suggest a slow drip. Inspect around the base of the furnace or air handler for any water or new rust after the first overnight cycle. Put your hand near the vent connections and feel for escaping flue gases. You should not feel warm air leaking from joints when the furnace is running. If you do, a simple re-seal with high-temperature sealant can fix it.
Walk outside and look at the pad for the outdoor unit. It should sit level, not wobble, and the refrigerant lines should be neatly insulated, with UV-resistant insulation on exposed runs. The insulation should not be compressed against sharp edges. Look at the electrical whip for strain. Gentle bends are good, tight kinks are not.
Finally, store the new filter size and replacement instructions somewhere visible. Many problems begin with a filter that is the wrong size or is forgotten. If the installer set you up with a media cabinet, note the model number of the media. If it is a washable filter, ask for the cleaning guidance and drying time. Some washable filters require 24 hours to dry fully. Reinstalling them damp can grow mildew in a hurry.
Insurance, warranties, and what to keep on file
Keep the invoice, the model and serial numbers, and pictures of the installed equipment and venting. Register warranties online within the window, typically 30 to 60 days. Some manufacturers offer extended parts or labor coverage when registered by an authorized dealer. If your homeowners insurance ever needs proof after an incident, these records help. For safety, also keep a note of gas valve settings, manifold pressure after setup, and refrigerant readings if the crew provides them. You may never look at those numbers again, but a future technician can compare and see if something drifted.
If your contractor offers a maintenance plan, read what it includes. A proper annual visit should check heat exchanger condition, inducer and blower amperage, flame sensor microamps, condensate trap cleaning, and safety switch operation. Those checks prevent many of the failures that lead to unsafe conditions later in the equipment life.
When DIY intersects with professional work, and where the line should be
Homeowners often ask what they can safely do themselves to speed up a heating unit installation. Moving stored items, laying protective runners, and clearing work zones are great. Swapping out a thermostat before the install can be fine if you are confident and the wiring is straightforward. However, opening gas piping, cutting venting, brazing refrigerant lines, or altering electrical circuits should be left to licensed professionals. Not because of gatekeeping, but because insurance, code compliance, and life safety are involved. A small misstep with a flue pitch or a missed burr in a gas flare can create hazards that only reveal themselves later.
If you want to be helpful during the install, be available for quick decisions and give the crew room to work. Provide a clear place to stage tools and parts. If you have a question about why something is being done a certain way, ask between steps rather than mid-solder or mid-wiring. Installers appreciate engaged homeowners who respect the rhythm of the job.
A compact pre-day checklist to prevent the common snags
- Clear a wide path from entry to the mechanical space and to the outdoor unit, including stairs and doors. Remove rugs that can slip. Identify and clear access to the electrical panel, gas shutoff, and water supply. Note any generators or battery backups. Contain pets, plan activities for kids, and set a firm boundary around the work zone. Stage drop cloths or runners and, for attic jobs, consider temporary flooring to spread weight. Confirm thermostat wiring and Wi‑Fi details, decide filter location, and review condensate drain routing with the installer.
The payoff: a safe day, a solid install, and a quieter winter
A heating replacement or new heating unit installation is more than a swap. It is a coordinated set of tasks around heat, flame, electricity, moving air, and sometimes pressurized refrigerant. Your contribution is to set the stage so the technicians can do their best work. When the home is ready, utilities are handled with care, ventilation is correct, and commissioning is thorough, you get a safer installation day and a safer system for years to come. You also get fewer service calls, steadier comfort, and equipment that runs the way the manufacturer intended. That is the point of all the planning: a warm house, no drama, and a system you barely notice except when you glance at the energy bill.
If the day ends with a walkthrough, take it. Ask the installer to show you the shutoffs, the filter slot, the condensate trap, and the thermostat settings. A five-minute tour cements what changed and where to look if something seems off later. When the first cold snap hits, you will appreciate that quiet confidence.
Mastertech Heating & Cooling Corp
Address: 139-27 Queens Blvd, Jamaica, NY 11435
Phone: (516) 203-7489
Website: https://mastertechserviceny.com/